
Crypto staking can be highly profitable if you select the right coins and a platform that offers a competitive return rate. In this case, we’re focusing on DOT (Polkadot) — a coin that might initially seem challenging to stake but is actually quite straightforward when you follow the correct steps.
While it’s possible to stake DOT through popular exchanges like Binance or KuCoin, we’ll walk you through the process of staking it directly via the official Polkadot website.
By staking DOT through the official site, you’ll not only contribute to enhancing the security of the network, but you’ll also earn staking rewards, which will vary depending on the amount of funds you commit to staking.

Step 1. Download the DOT wallet plugin and create an account
First and foremost, you’ll need an official Polkadot wallet. It’s worth noting that there is a version available as a browser extension, which functions similarly to the well-known MetaMask wallet for Chrome.
To get started, you can download the Polkadot extension from the following links:
Download for Chrome .Download for Firefox .
After downloading, the extension will request installation permissions, which you should approve. Once installed, navigate to your browser’s extensions area, locate the Polkadot extension, and select it. From here, you’ll be able to set up your account within the Polkadot wallet, which is essential for staking.

A pop-up window—similar to the one shown in the example above—will appear. In this window, you’ll need to fill in the first two highlighted fields with your desired username and then set a strong, secure password.
To complete the process of creating your account for staking, simply check the third and final box, labeled either “Add account” or “Add the account”. This action will finalize the setup of your Polkadot staking account.
Step 2. Make configurations in the Polkadot wallet
Once your Polkadot wallet is created, the next step is to visit the official Polkadot website. You can access it here: polkadot.js.org.
From the homepage, navigate to the Apps Wallet section — or go directly using this link: polkadot.js.org/apps.
Once inside the Apps interface, head to the top navigation menu and select: Accounts > Accounts. This is where you’ll manage your staking account and view your Polkadot wallet details.

Now, you’ll need to add the account you created earlier so that any funds you deposit will appear correctly, allowing you to begin staking DOT.
To do this, simply look toward the lower middle section of the page for the option labeled “Add account”. Clicking this will link your newly created Polkadot wallet account to the platform, enabling you to manage your staking operations seamlessly.

Step 3. Submit DOTs for staking
You’re now one step closer to staking DOT — all that remains is to deposit funds into your wallet. To do this, you can use any cryptocurrency exchange where DOT is listed, such as Binance.
Simply initiate a transaction from Binance to the address of your Polkadot wallet. Once the transfer is complete, you’ll be able to view your available funds in the Accounts section on the Polkadot website.
This is typically a fast and efficient process; network validation usually takes no more than 5 minutes, allowing you to start staking shortly after your deposit.
Step 4. Choose the validators
Please note that these steps are crucial, as they directly influence the rewards you’ll earn from DOT staking.
Assuming your funds are already deposited into your Polkadot wallet, the next step is to navigate to the “Network” section (or “Red”, depending on your language settings) located in the top menu bar of the Polkadot website.
From the dropdown options that appear, select “Staking” (or “Participation” if that’s the label displayed). This section is where you’ll begin managing your staking activity and selecting validators to maximize your staking returns.

Now comes the most important step: choosing the right validators. For DOT staking to be both profitable and secure, it’s essential to pay attention to the labels or badges the platform assigns to each validator.
- Produced Blocks: This indicates the number of blocks the validator has successfully produced. A higher number here usually means a more reliable and profitable validator.
- Oversubscribed: If a validator has this badge, it means they are overloaded with delegations. Choosing an oversubscribed validator is generally not recommended, as rewards may be reduced.
- Slashed: The most critical warning badge. Validators marked as Slashed have either lost funds or been involved in malicious activity that harmed delegators. Never choose a validator with this mark, as it poses a high risk to your stake.
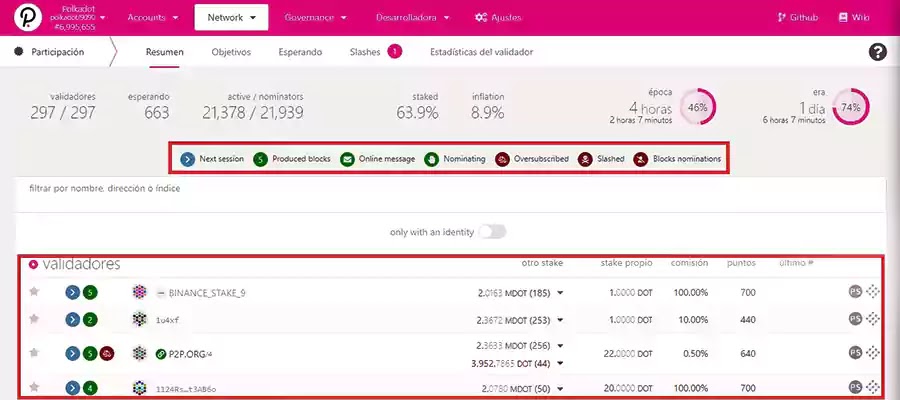
The badges we mentioned are displayed in the middle of the webpage, clearly marked within a red box for easy identification. Below that, in the larger section, you’ll find the list of validators, with their respective badges located on the left side of each entry.
In addition to these badges, it’s important to carefully evaluate the data shown on the right side of each validator. This information includes crucial details such as the number of tokens they have staked, the commission fees they charge, and other relevant metrics that will help you make an informed decision for your DOT staking.

Clearly, a validator charging a 100% commission will leave you with no profits, so these options should be immediately ruled out.
In summary, when selecting a validator for DOT staking, aim for one that has a high amount of staked tokens, charges a commission between 1% and 5% to ensure profitability, and carries the “Produced Blocks” badge. This combination will help maximize your staking rewards while maintaining a secure and reliable investment.
Step 5. Set validators, confirm, and wait for approval
You’re almost ready to start DOT staking. The final step is to navigate once again to the top menu and select: Account Actions > Nominator.
This section allows you to nominate validators and officially begin earning rewards from your staked DOT.


After specifying the amount of funds to stake, simply click “Next” to proceed. Then, start selecting the validators you previously evaluated. It’s crucial to choose each validator carefully by their exact name to avoid mistakes.
Important: You must select at least 5 validators. This ensures that if one validator becomes unavailable, it will be automatically replaced by the next on your list, keeping your DOT staking continuous and uninterrupted.

In the image above, you can see two boxes: the left box lists all available validators. To select a validator, simply type their name or click on it, and it will automatically move to the box on the right, which shows your chosen validators.
Once you’ve finished selecting your preferred validators, click the “Bond & Nominate” button. You’ll then be asked to confirm the action and enter your password to verify the transaction. After this step, congratulations — you will officially be staking DOT!

sitedmb@gmail.com